Where Every Scroll is a New Adventure
Art Tutorial - Blog Posts
I thought this was super cool! Also helpful reference for something to attempt later.


If there are any spelling mistakes, no there aren't. I just can't read or write.
The continuation of my clouds tutorial from last week.
I made an art/anatomy tutorial about birds! I hope people will find it helpful!


I made an art/anatomy tutorial about birds! I hope people will find it helpful!
The-ford-twin’s contribution saved my brain. I knew this but I keep getting conflicting information online so I gaslight myself into thinking I’m wrong even though I do both digital and traditional media.
And eventually there will come a time where you can just paint your own way when you feel confident enough.

These are good I might look back at later
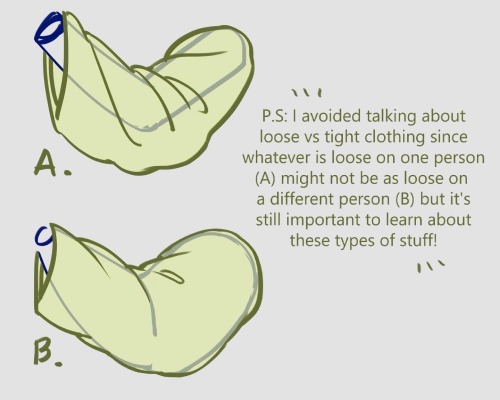
I forgot I have to be active here so here’s my Twitter tutorial on how to draw folds I made a while back to help a friend!


Excellent tutorial to drawing cubby body types
“Some chubby guide for y’all!”
Source: paggiart on twitter
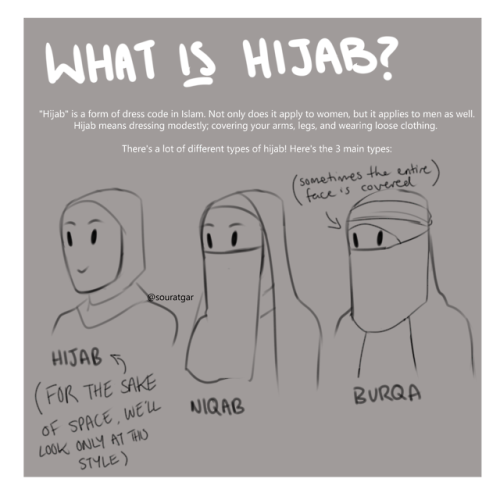


I made an art tutorial on how to draw hijab and hijabis!
mutherfucking chainmail brush
How to make a super awesome easy cheating chainmail brush for photoshop or any program that lets u make brushes
step one
draw a fucking loop

step tw0
take ur loop. go to edit > define brush preset (or whatever u use to make brushes idk man i use photoshop)
bam. now u got a brush.
but it does this shit.

and we don’t want it to do that shit.
so what u gotta do is
step 3
go to ur lil brush widget thingy

(this guy)
and he;ll take u to this sweet toolbox menu thingy

and then all u gotta do is fuck around with the spacing until it looks vaguely chain linky
and then u can do sweet arts like this

this tutorial has been brought to u by sleep deprivation
dont do art kids
now go forth and create beautiful chainmail without bawling you r eyes out as u singlHANDDLY draw every single fucking loop


with the uncertainty of social platforms sticking around in recent years, i would recommend artists to get PureRef and start saving their bookmarks & art references on their own curated PureRef boards instead!
try for free here!
I love your art so much!! It's inspiring me to get back into pixel art (I gave up quickly). A huge problem I had was I didn't know what size was best to set my canvas for specific projects. I always ended up overestimating and making it too big and then it looked less like pixel art and more like grainy digital art. Do you have a rough guide you stick to for landscapes/bedrooms/cities VS. things like animals and characters?
aw thank you i'm happy to hear that! i hope u stick with it ♥
with landscapes/bedrooms/cities i use 275x155. this provides a fair amount of detail while still keeping it pixely, plus it resizes to wallpaper size. for vertical i just reverse it at 155x275.
i've also recently started to use 215x215 (same amount of pixels as above) so that i can resize my art to easily fit both wallpapers, and mobile videos... since tiktok and instagram reels are everything nowadays 😒
for characters and animals, generally i will base the size of the canvas around how i stylize eyes.


so i'll draw the eyes first, then just draw everything else around that.


i also have a smaller resolution style with 2px dot eyes that i use for adding characters to landscapes, since my landscape resolution is too small for my regular style unless the character is close to the screen.
hope this helps!
ATTENTION LAZY ARTISTS 📢‼️ if you want to make a 'grounded' interior or exterior scene with perspective, just make a barebones mockup in the sims first and trace them. just the furniture and the room itself are the important part, add the decor when you redraw it!
hello, i'd like to inform u that i find ur art extremely beautiful and bc of that i got the urge to learn how to do pixel art, so yeah its been a while since doing anything art related so thanks. do u have any tips for begginers? hope ur doing well ♡
thank you so much!! always happy to inspire 💗💛
the biggest resource i used when i was learning pixel art was the pixeljoint forums. you can see the most popular resources here!
(i would skip over any of the threads about software, they're all dated before aseprite came out. its genuinely the only software you need nowadays. it's on steam!)
this thread especially is very useful for first learning the basic rules.
there' s a lot of things that are specific to pixel art that you will need to learn, but there is also a lot of general art knowledge you'll need. i've been doing studies and school for art longer than i can remember. just takes a lot of time, that's all there really is to it : )
For my 100th post, I want to show you guys how I make some of my art!
First I will make a base that looks like a stick figure, sorta... the stereotypical circle with a t in it that a lot of artists use. This technique is actually used to know where you are gonna place the eyes, mouth, and other facial features. Your drawing can be sketchy if you would like and I will explain why next.


Next, I will upload the picture to a digital art program, it can be anything even MS paint, I would recommend an art program that has a lasso tool,(the tool where you circle something and you are able to move it) a layering system, (EXTREMELY USEFUL) you are able to rotate the screen, and where you can pick your own colors off of a color wheel or square. I am not able to download any programs on this computer so I am using Chrome Canvas, which came with it. I usually use FlipaClip since animation apps in my experience have worked better even for a non-moving drawing. I will put a layer above it and trace the lines I like best. I usually use my finger and not the mouse or mousepad just because it is easier/more comfortable for me. The 78 on the left of the right picture is the size of the brush I am using, I just write it down to remember it when I switch sizes for different lines.


After I am done finishing the line art, I move on to color. For this I usually start on the darker lines like the dark green lines on the helmet, I do this because If I were to do the light green color on the helmet, I cannot see where I wanted the dark green lines behind it. You can always just hide the light green by pressing a hide button (usually in the shape of an eye) I do the darker green and the lighter green on the helmet on different layers, the dark green above the light so it does not cover the dark ones up. Remember to keep the Lineart above the other layers while you do this. The yellow numbers on the right of the right picture are codes for colors, sometimes when you go to your color wheel or square there is a area to type that has a # sign in front of it, different codes give you different colors, and since I cannot save those colors on a palette I write them down for later just in case. You may not need to do this if you can save colors to a palette or an eyedropper tool. (much easier..) Right below the line art and above the two color layers, I add a shading layer. You can shade to your heart's content, but deciding on where the light comes from helps show you where shadows would be realistically.

Next, I erase the color so it stays inside the lines, and remove the background. (In a lot of my drawings I usually keep the background I traced it from, for example, my Ripjaws drawing, because I think it looks nice, but that is just my preference..) After that, I re-color the background (usually a solid color but I am working on making backgrounds as I grow, again, preference!) Then I add finishing touches like the white lines on the face like the cartoons. I honestly prefer the image on the left though.


Sorry for such a long post! thank you for sticking with me for so long! I thank all 59 followers for supporting my art and interests and being there. I hope you have a nice day you majestic people.
STORYBOARD/ANIMATIC TIPS
ko-fi✏️
I made these for my friends, but I thought that might be helpful for yall as well! hehe! Now whenever someone asks for storyboard tips I can throw this at them!


Examples of storyboards I made for fun:


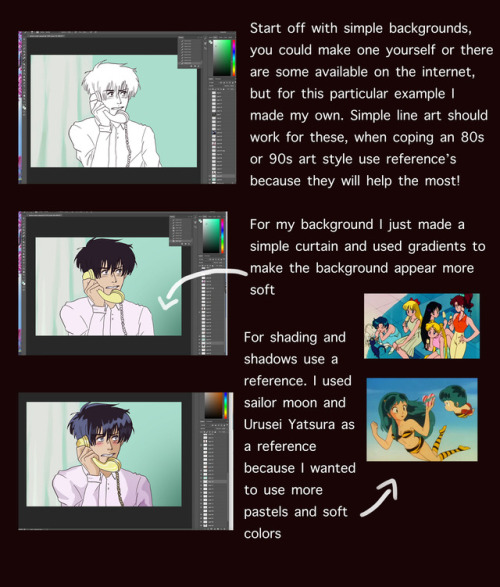
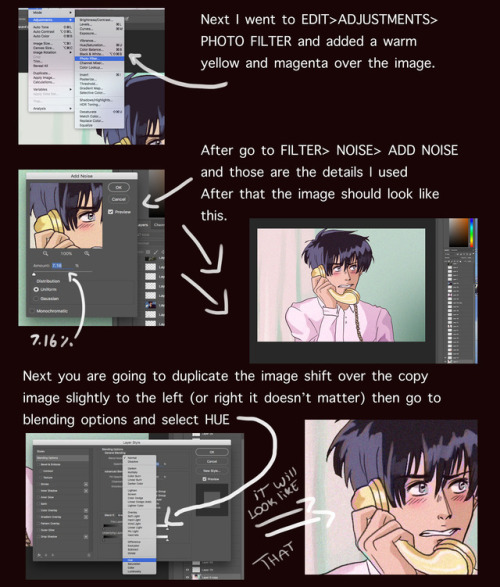
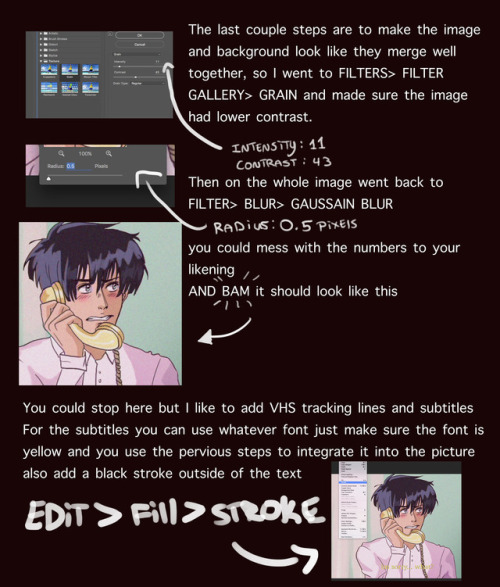
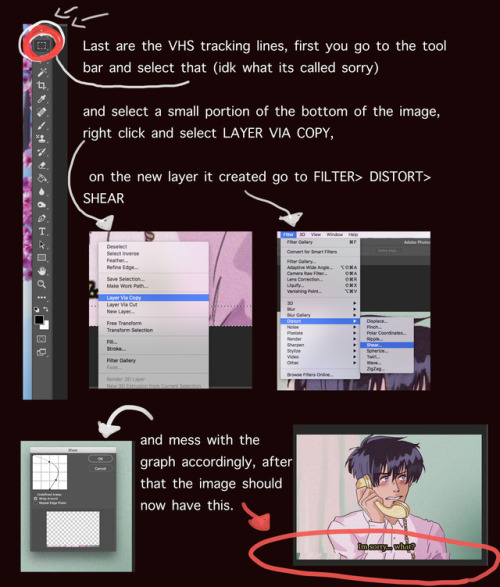
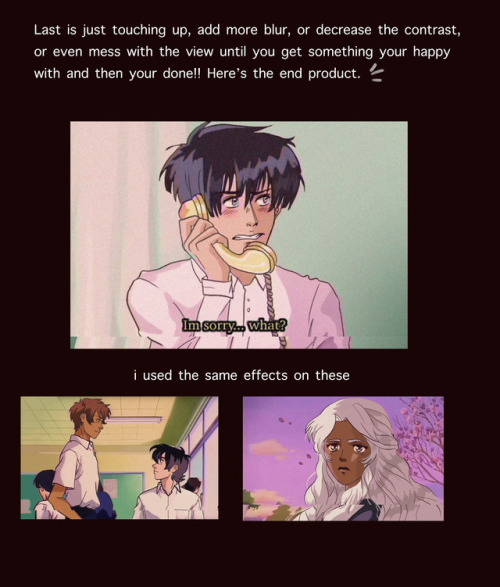
I got a lot of asks about this so I made a tutorial on how I was able to emulate the 80s aesthetic, please keep in mind I’m not an expert and what I put here is just what I personally did. I hope you guys like it and hope it helps
go crazy kids
Impressive!! *clapping hands*
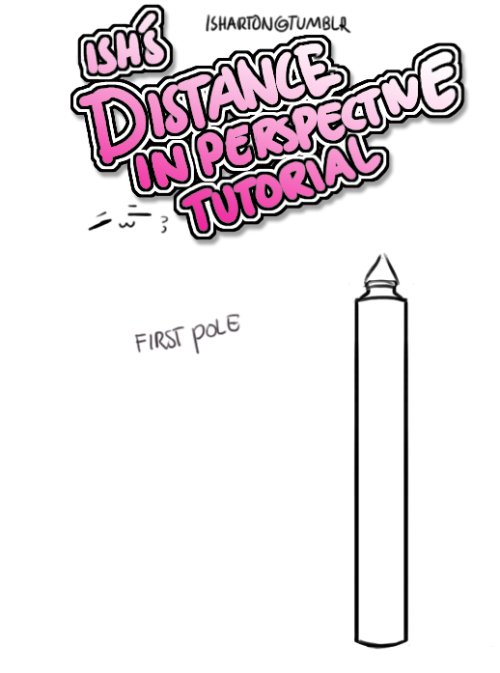

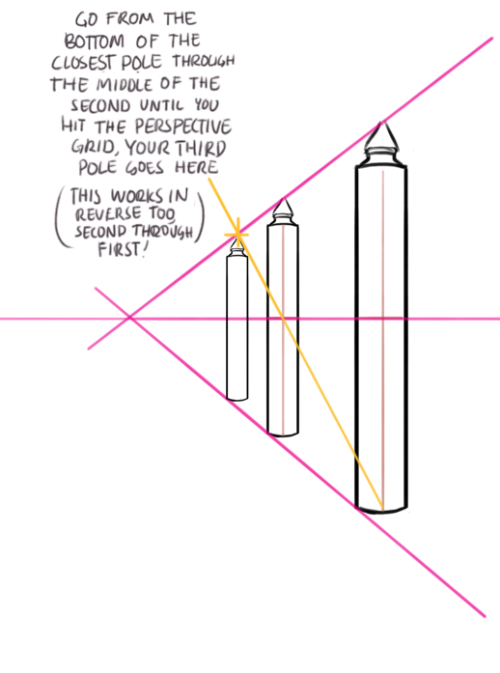

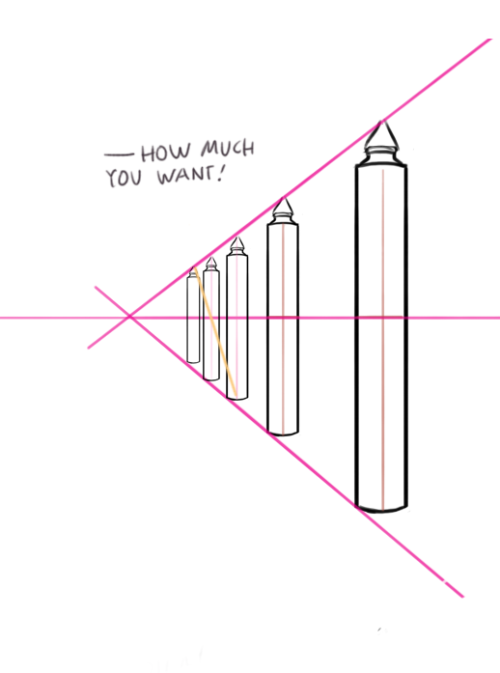

Thing i learned some time ago! hope you all find it helpful ( perspective grids can be your friend!)
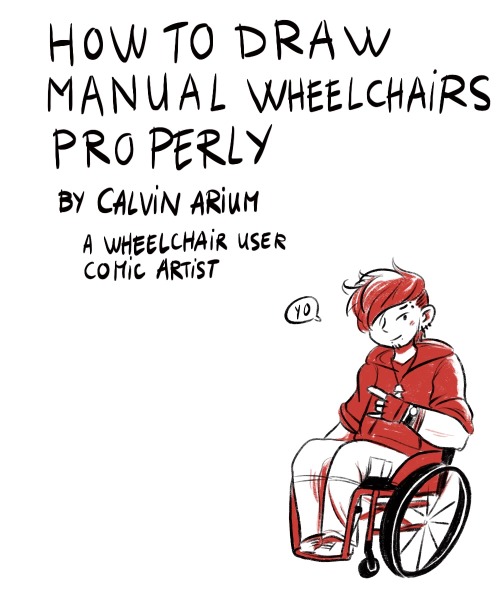


It’s here !! The guide for two-legged people who don’t know how to draw wheelchairs !!! 7 pages of infodump ! Disclaimer : I don’t know everything, I have one (1) experience of wheelchair user who used both bad and good chairs, and I share what I learned.
Image description :
1) Calvin in his wheelchair saying “yo” under a huge title “how to draw manual wheelchairs properly by Calvin Arium, a wheelchair user comic artist”.
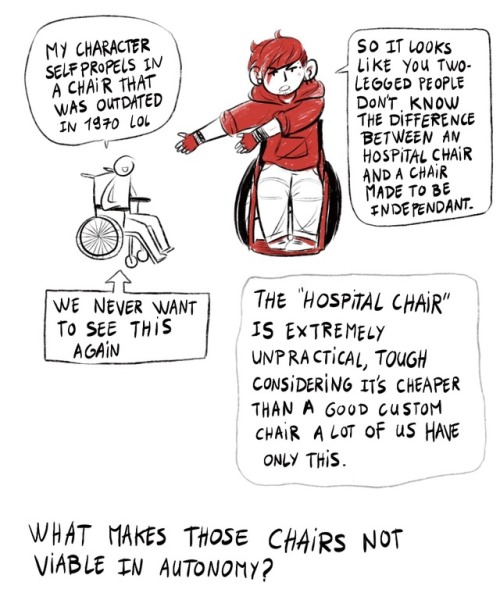
2) A character says “my character self propels in a chair that was outdated in 1970 lol” Calvin says “so it looks like you two legged people don’t know the difference between an hospital chair and a chair made to be independant” an arrow point the crapppy chair, saying “we never want to see this again”
a bubble says “the hospital chair is extremely unpractical, tough considering it’s cheaper than a good custom chair a lot of us have only this”
3) a character hurt himself trying to reach the wheels of the hospital chair. Several arrows point why the chair is unpractical : “high backrest restrain shoulders movement” “huge armrest restrains wheel access” “separated footrest : amovible, cheap, bulky” “x structure, foldable but heavy” “huge front casters for stability” “heavy wheels”
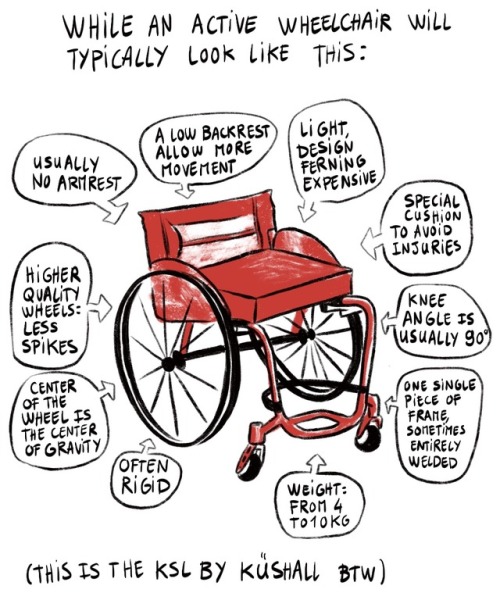
4) Several arrows point an active wheelchair (the KSL by Küshall) : “usually no armrest” “a low backrest allow more movement” “light, design, ferning expersive” “special cushion to avoind injuries” “knee angle is usually 90°” “one single piece of frame, sometimes entirely welded” “weight : from 4 to 10kg” “often rigid” “center of the wheel is the center of gravity” “higher quality wheels : less spikes”
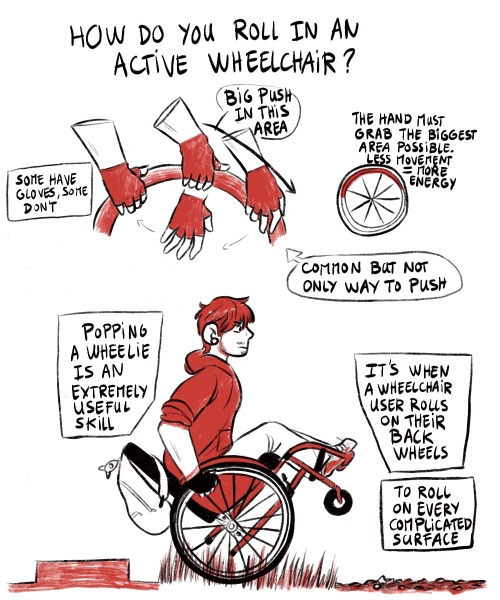
5) A hand grab different parts of the wheel, pushing harder in the second half. Bubbles says “some have gloves, some don’t. The hand must grab the biggest area possible. Less movement = more energy. This is a common but not only way to push.Calvin is on his back wheels, rolling on grass and dirt bubble says “popping a wheelie is when a wheelchair user rolls on their back wheels to roll on every complicated surface.
6) several drawings illustrate the folding frame, the ergonomic but rigid and expensive backrest, the separated footrest (only for folding frame), the handles, the folding handles, athe amovibles handles, or no handles, the cool fancy loopwheels, the pretty custom colors
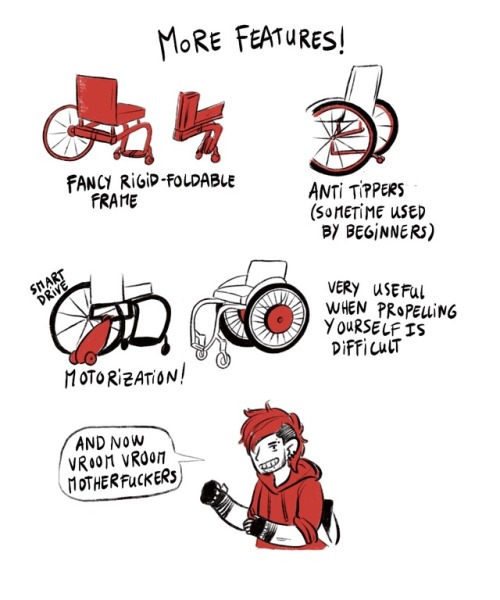
7) More Features ! The fancy rigid-foldable frame, the anti tippers (sometimes used by beginners), the motorization (wheels, smart drive) when propelling yourself is difficult Calvin says “and now vroom vroom motherfuckers”
Good to know info.
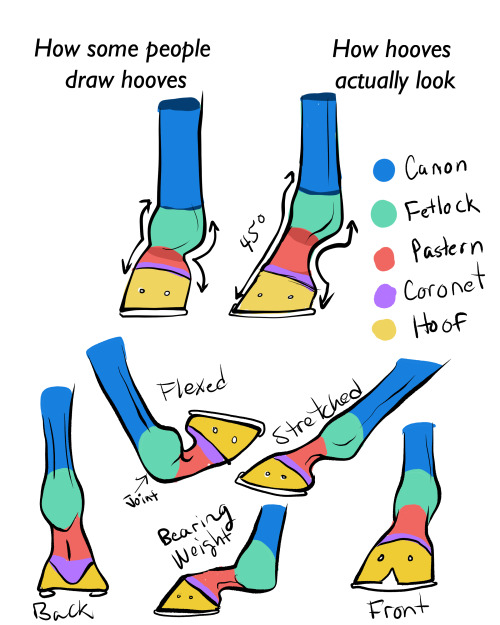
for all of you who struggle to draw horse feet. :) You’ve gotta have those pasterns in there, as they are the horse’s main shock absorbers, as seen in the “bearing weight” example.
If you can handle an animal autopsy, here’s an interesting vid on how the muscles and joints work in the lower leg of the horse.
That’s a good tutorial. Thanks!
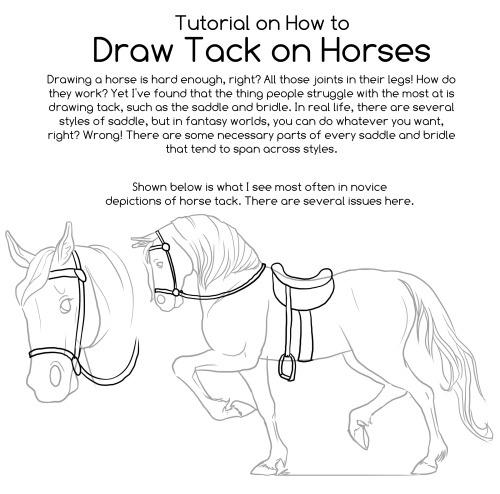
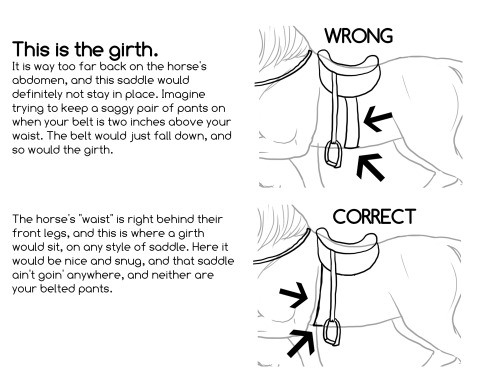
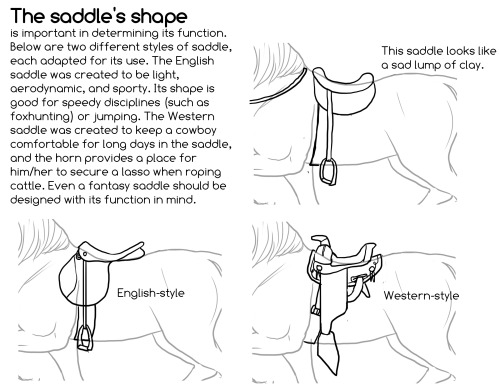
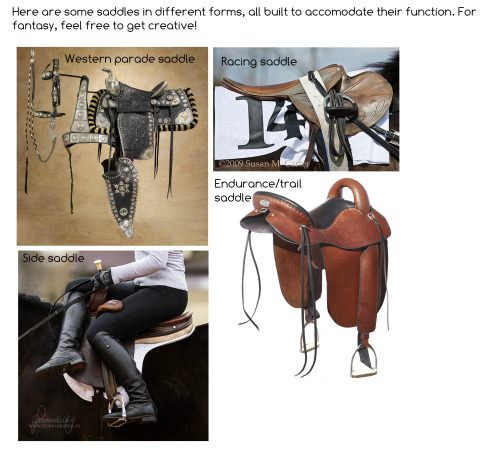
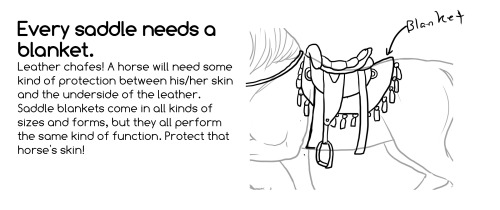
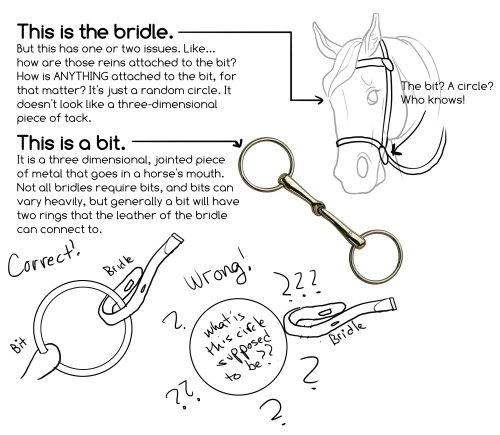
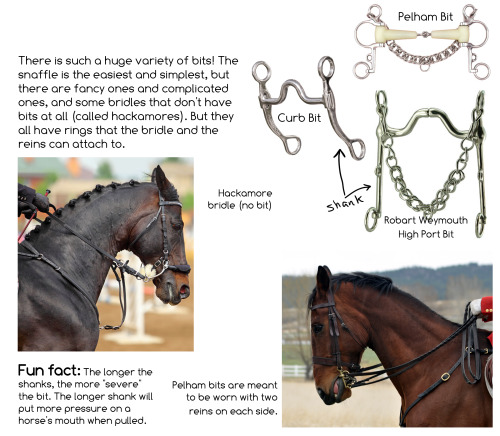
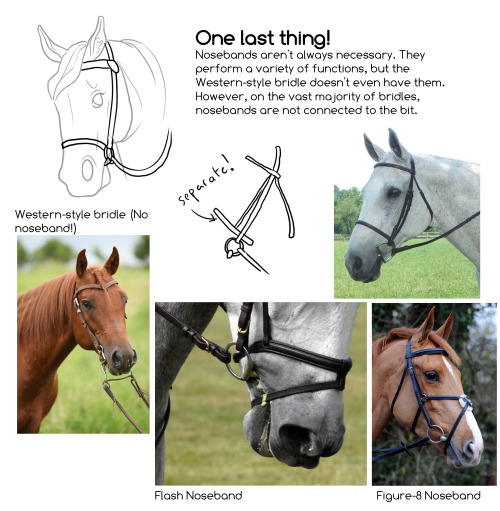
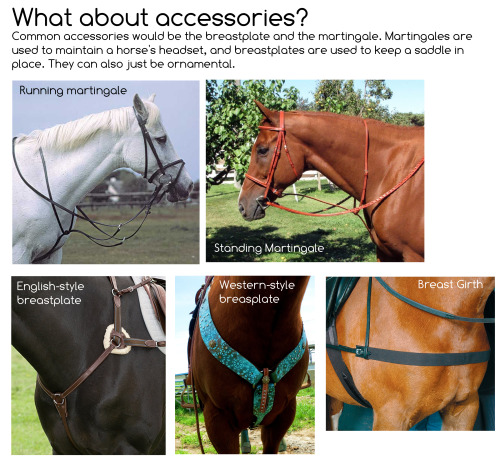
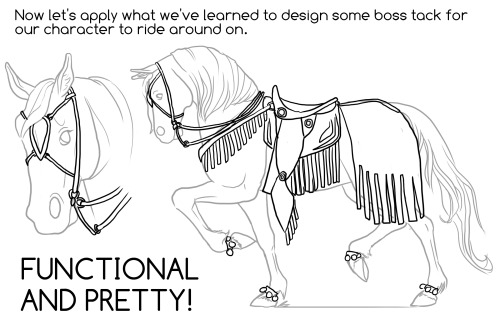
I am such a huge horse nerd and I apologize. :( But I’m really tired of seeing girths that are halfway down a horse’s stomach. This may not be interesting to anyone who is not me, but I like to draw fancy saddles and ridiculously long shanks on bits. Also, horses are the only animal I can draw, so I take advantage of that.
I hope this helps some frustrated non-horsey artists in at least some small way. Remember, when in doubt, add some buckles and some rings. :)
Art Tutorials
Some weeks ago I put some videos/tutorials I find really helpful on Deviantart, and now I’m putting them here too. Most of them aren't about drawing specifically humans/dragons/water/etc, but they can help you improve your pictures in general.
Here's the Thing About 1 Pt Perspective
Understanding Composition
Here's the Thing About: Atmospheric Perspective composition
How to Practice Drawing
How to Choose Colours That Work
This picture about color & value
Tutorial - CGing part 1
Tutorial - How To CG part 2
Dipping into Digital
Thank you for the instructions for making chibi roses

Chibi foliage guide: Rose (pt.2)


Eye tutorial
Also have this really quick and short tutorial on how I draw Dark's eyes when I am not a lazy cunt.
Your art is so aesthetically pleasing?? How do you pick colours-


First of all tHANK YOU SO MUCH IM SO HAPPY YOU LIKE ME COLOURS!!! AnD ALSO IM SO SORRY THIS TOOK DO LONG BUT I REALLY WANTED TO THINK ABOUT HOW I DO THIS!! Cause mostly for me this stuff is now second nature!! But it’s all abOUT COLOUR THEORY MY DUDES!! :DD
ALSO THIS IS JUST WHAT I DO I AINT TELLING YALL WHAT TO DO OR ANYTHING!! YALL LIVE YOUR LIFE HOW YA WANT
How to make Memorable content! Creating a Brand
Heres a simple video following the beginning of my process of creating my own brand where I showcase three simple steps to get started.
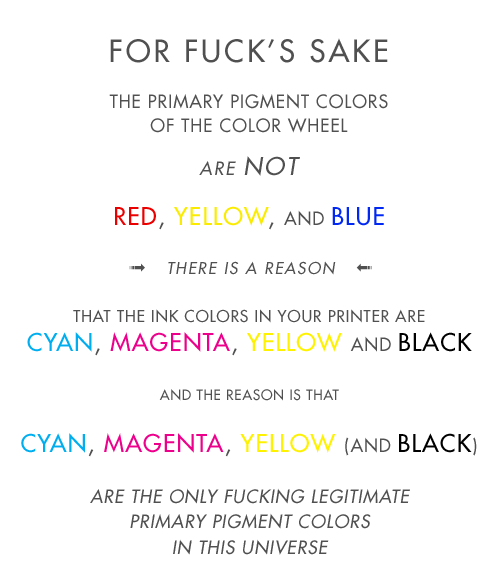
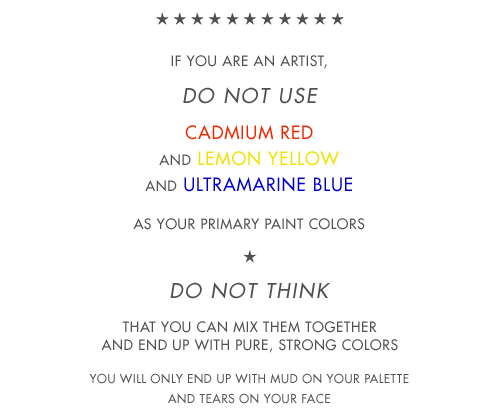
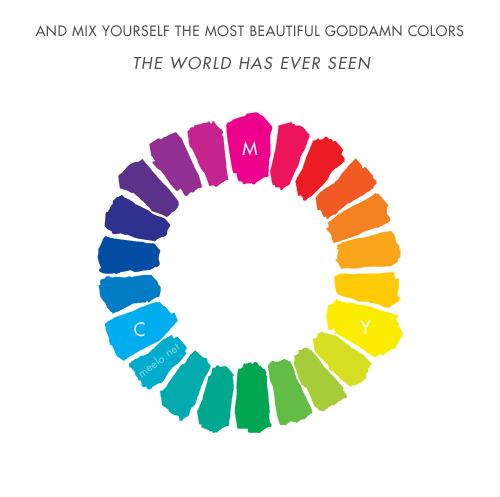
If you suck with color harmony make a limited color wheel.
additionally if you suck with values and saturation use color sliders.

I havent used the traditional color wheel in over a year lol.


GoldCanines: “I had lots of questions on how I go about my shading ! ✨
Here is how I pick my colors, determine my layers, and lay out my shading !”
Source: GoldCanines on Twitter