Where Every Scroll is a New Adventure
Art Advice - Blog Posts


Overview of some topics when it comes to drawing characters who are burn survivors.
DISCLAIMER. Please keep in mind that this is an introductory overview for drawing some burn scars and has a lot of generalizations in it, so not every “X is Z” statement will be true for Actual People. I'm calling this introductory because I hope to get people to actually do their own research before drawing disabled & visibly different characters rather than just making stuff up. Think of it as a starting point and take it with a grain of salt (especially if you have a very different art style from mine).
Talking about research and learning... don't make your burn survivor characters evil. Burn survivors are normal people and don't deserve to be constantly portrayed in such a way.

edit: apparently tum "queerest place on the internet" blr hates disabled people so much that this post got automatically filtered. cool!
Something I try to keep in mind when making art that looks vintage is keeping a limited color pallette. Digital art gives you a very wide, Crisp scope of colors, whereas traditional art-- especially older traditional art-- had a very limited and sometimes dulled use of color.
This is a modern riso ink swatch, but still you find a similar and limited selection of colors to mix with. (Mixing digitally as to emulate the layering of ink riso would be coloring on Multiply, and layering on top of eachother 👉)
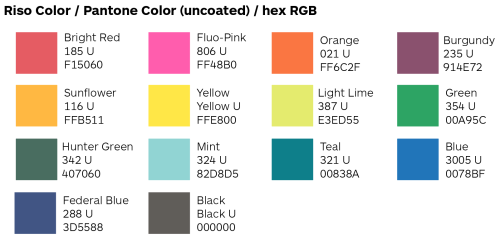
If you find some old prints, take a closer look and see if you can tell what colors they used and which ones they layered... a lot of the time you'll find yellow as a base!
Misprints can really reveal what colors were used and where, I love misprints...
Something else I keep in the back of my mind is: how the human eye perceives color on paper vs. a screen. Ink and paint soaks into paper, it bleeds, stains, fades over time, smears, ect... the history of a piece can show in physical wear. What kind of history do you want to emulate? Misprinted? Stained? Kept as clean as possible, but unable to escape the bluing damages of the sun? It's one of my favorite things about making vintage art. Making it imperfect!

You can see the bleed, the wobble of the lines on the rug, the fading, the dirt... beautiful!!
Thinking in terms of traditional-method art while drawing digital can help open avenues to achieving that genuine, vintage look!
People who do art commissions what’s your tips?
I have had a few people asking , but I want to make sure I now the best way to do it
What’s your price range?
What do u use to get payment?
How do u ensure payment?
Anything else u thinks important
Im redrawing this thing What Mewshroom spot pattern do you prefer? Which one is more mushroomy? (the spots are just a rough sketch to see how they look, i will clean them up)
I`m asking on other platforms too cus im indecisive lol


It's a mewshroom🐱🍄
i'm so tired of the online art influencer mentality that in a sketchbook everything in it has to look amazing and polished and flawless it's so performative!!!! sketchbooks should be for drawing stupid shit
Can't afford art school?
After seeing post like this 👇

And this gem 👇
As well as countless of others from the AI generator community. Just talking about how "inaccessible art" is, I decided why not show how wrong these guys are while also helping anyone who actually wants to learn.
Here is the first one ART TEACHERS! There are plenty online and in places like youtube.
📺Here is my list:
Proko (Free, mostly teaches anatomy and how to draw people. But does have art talks and teaches the basics.)
Marc Brunet (Free but he does have other classes for a cheap price. Use to work for Blizzard and teaches you everything)
Aaron Rutten (free, tips about art, talks about art programs and the best products for digital art)
BoroCG (free, teaches a verity of art mediums from 3D modeling to digital painting. As well as some tips that can be used across styles)
Jesse J. Jones (free, talks about animating)
Jesus Conde (free, teaches digital painting and has classes in Spanish)
Mohammed Agbadi (free, he gives some advice in some videos and talks about art)
Ross Draws (free, he does have other classes for a good price. Mostly teaching character designs and simple backgrounds.)
SamDoesArts (free, gives good advice and critiques)
Drawfee Show (free, they do give some good advice and great inspiration)
The Art of Aaron Blaise ( useful tips for digital art and animation. Was an animator for Disney. Mostly nature art)
Bobby Chiu ( useful tips and interviews with artist who are in the industry or making a living as artist)
Sinix Design (has some tips on drawing people)
Winged canvas (art school for free on a verity of mediums)
Bob Ross (just a good time, learn how to paint, as well as how too relax when doing art. "there are no mistakes only happy accidents", this channel also provides tips from another artist)
Scott Christian Sava (Inspiration and provides tips and advice)
Pikat (art advice and critiques)
Drawbox (a suggested cheap online art school, made of a community of artist)
Skillshare (A cheap learning site that has art classes ranging from traditional to digital. As well as Animation and tutorials on art programs. All under one price, in the USA it's around $34 a month)
Human anatomy for artist (not a video or teacher but the site is full of awesome refs to practice and get better at anatomy)
Second part BOOKS, I have collected some books that have helped me and might help others.
📚Here is my list:
The "how to draw manga" series produced by Graphic-sha. These are for manga artist but they give great advice and information.
"Creating characters with personality" by Tom Bancroft. A great book that can help not just people who draw cartoons but also realistic ones. As it helps you with facial ques and how to make a character interesting.
"Albinus on anatomy" by Robert Beverly Hale and Terence Coyle. Great book to help someone learn basic anatomy.
"Artistic Anatomy" by Dr. Paul Richer and Robert Beverly Hale. A good book if you want to go further in-depth with anatomy.
"Directing the story" by Francis Glebas. A good book if you want to Story board or make comics.
"Animal Anatomy for Artists" by Eliot Goldfinger. A good book for if you want to draw animals or creatures.
"Constructive Anatomy: with almost 500 illustrations" by George B. Bridgman. A great book to help you block out shadows in your figures and see them in a more 3 diamantine way.
"Dynamic Anatomy: Revised and expand" by Burne Hogarth. A book that shows how to block out shapes and easily understand what you are looking out. When it comes to human subjects.
"An Atlas of animal anatomy for artist" by W. Ellenberger and H. Dittrich and H. Baum. This is another good one for people who want to draw animals or creatures.
Etherington Brothers, they make books and have a free blog with art tips.
📝As for Supplies, I recommend starting out cheap, buying Pencils and art paper at dollar tree or 5 below. If you want to go fancy Michaels is always a good place for traditional supplies. They also get in some good sales and discounts. For digital art, I recommend not starting with a screen art drawing tablet as they are usually more expensive.
For the Best art Tablet I recommend either Xp-pen, Bamboo or Huion. Some can range from about 40$ to the thousands.
💻As for art programs here is a list of Free to pay.
Clip Studio paint ( you can choose to pay once or sub and get updates. Galaxy, Windows, macOS, iPad, iPhone, Android, or Chromebook device. )
Procreate ( pay once for $9.99, IPAD & IPHONE ONLY)
Blender (for 3D modules/sculpting, animation and more. Free)
PaintTool SAI (pay but has a 31 day free trail)
Krita (Free)
mypaint (free)
FireAlpaca (free)
Libresprite (free, for pixel art)
Drawpile (free and for if you want to draw with others)
IbisPaint (free, phone app ONLY)
Medibang (free, IPAD ONLY)
NOTE: Some of these can work on almost any computer like Clip and Sai but others will require a bit stronger computer like Blender. Please check their sites for if your computer is compatible.
So do with this information as you will but as you can tell there are ways to learn how to become an artist, without breaking the bank. The only thing that might be stopping YOU from using any of these things, is YOU.
I have made time to learn to draw and many artist have too. Either in-between working two jobs or taking care of your family and a job or regular school and chores. YOU just have to take the time or use some time management, it really doesn't take long to practice for like an hour or less. YOU also don't have to do it every day, just once or three times a week is fine.
Hope this was helpful and have a great day.
"also apologies for any spelling or grammar errors, I have Dyslexia and it makes my brain go XP when it comes to speech or writing"
Help I dontknow what to do with her hair and the background (under cut cause anime girl's tits and malnourished body)


If you don’t like doing art warmups because you want to get straight to the thing you wanna draw, do a warmup related to what you want to be drawing. I wanna draw heracross so to warm up I’m drawing roly-poly’s (pill bugs whatever).
I just find that trying to draw random shapes as warmups just makes me bored and uninterested.
It’s weird when someone asks how to develop an art style. Like I kept trying to draw and incorporating what I liked (big heads, fluffy, ect) and dropping what I didn’t (mouths) and eventually you’ll get your own style (sometimes against your will). Just do what you want
I think at some point in time we need to sit down and start explaining to artist who want to make a career out of art that there are FAR more options than just "living off of commissions" and "posting my art online and praying I get paid for it".
Sum art tips coming thru (note that I’m myself self-taught and I myself lack some many skills, but this is helpful)
I don’t know how much you’ve already heard, I think your art is cute, definetly a lot of potential and talent shining through, so
I like the way you draw cartoon characters (Invader Zim dog looks amazing, also little Max in the last one aawwww) and faces seem to be your strenght, like in Stolas fanart. I see you have knowledge about basics unless you’re just pretty good with drawing from refference, which is not bad at all; I’ll even talk about it later, but you need to tell why a certain line is there.
Try more dynamic poses. It’s best to start with contraposto (one leg resting, pelvis and shoulder girdle tilted) and some less complicated stuff. Not so long ago I realized runway fashion models (especially men) have basic yet captivating poses, made me realize I’m not drawing too big head, I just draw too short spine heh.
Use different kind and sharpness of pencils (cries in lost pencil set. I’m mourning you my HB, B2, F pencils). It’ll make sketch more clear and easier for you to erase and add lines.
Line weight for the love of God. Coined to the one above; lineart (and sketch in general) is more readable if you apply different weight e.g. far away stuff are thin smudges, single lines, areas with more shadow on them are thicker, details draw with sharper pencil than outlines.
You know this fancy lines you draw when doing a head (if you use circle to create head. My personal favourite, box method doesn’t suit me)? Yeah, let me show you something real quick


Treat you’re base lines as a skeleton, they’re a 3D objects put on paper, you can rotate them in your mind, you can dislocate joints and open a stomach.
When you wrinkle clothes think what and where they are resting on. Pants will be more likely to wrinkle in a joint areas while jackets on elbows and abdomen. So you know where it goes ~refference and observation~. The saints of art, even cartoon one.
That’s it for now, hope I helped. This answer took me long, I genuinely wanted to give some tips considering whenever I ask about criticism I truly want someone to answer and pinpoint what I need to work on, so posts like this are very important for me
i needed somewhere to dump my max drawings so i decided on here!!! B]
(constructive criticism is welcome + wanted!!)
![I Needed Somewhere To Dump My Max Drawings So I Decided On Here!!! B]](https://64.media.tumblr.com/387d210047b9418868d5963ead4d72de/fa2b50a5b423a049-8d/s2048x3072/d505d7f5a1eef0b70ccd38a88844d0661017c9c8.jpg)
![I Needed Somewhere To Dump My Max Drawings So I Decided On Here!!! B]](https://64.media.tumblr.com/fc586a4dd046b2ec22a383cf620e0a27/fa2b50a5b423a049-26/s1280x1920/f407f8bc86d21b384c74ae457fd02d59c7208604.jpg)
![I Needed Somewhere To Dump My Max Drawings So I Decided On Here!!! B]](https://64.media.tumblr.com/1bfd5d4f9f4c198dc2ff9ec82501bb2a/fa2b50a5b423a049-ef/s500x750/7b659b0da7fd6394479d15692b49c4a7e51311fb.jpg)


why do i keep seeing whole videos on advice for artfight from “veterans” or whatever. here’s all the advice you need:
you don’t need to draw every day
you don’t need to fully render every drawing, sketches still count and the person receiving it will still love it
you don’t need a fully polished ref sheet for every single character, having a basic one or even just a colour palette along with whatever other art you’ve done works fine in most cases
you don’t need to draw a fully rendered piece every single day do not burn yourself out or injure yourself for funny little internet points good lord
boom done there’s your 15 minute video
Can't afford art school?
After seeing post like this 👇
And this gem 👇
As well as countless of others from the AI generator community. Just talking about how "inaccessible art" is, I decided why not show how wrong these guys are while also helping anyone who actually wants to learn.
Here is the first one ART TEACHERS! There are plenty online and in places like youtube.
📺Here is my list:
Proko (Free, mostly teaches anatomy and how to draw people. But does have art talks and teaches the basics.)
Marc Brunet (Free but he does have other classes for a cheap price. Use to work for Blizzard and teaches you everything)
Aaron Rutten (free, tips about art, talks about art programs and the best products for digital art)
BoroCG (free, teaches a verity of art mediums from 3D modeling to digital painting. As well as some tips that can be used across styles)
Jesse J. Jones (free, talks about animating)
Jesus Conde (free, teaches digital painting and has classes in Spanish)
Mohammed Agbadi (free, he gives some advice in some videos and talks about art)
Ross Draws (free, he does have other classes for a good price. Mostly teaching character designs and simple backgrounds.)
SamDoesArts (free, gives good advice and critiques)
Drawfee Show (free, they do give some good advice and great inspiration)
The Art of Aaron Blaise ( useful tips for digital art and animation. Was an animator for Disney. Mostly nature art)
Bobby Chiu ( useful tips and interviews with artist who are in the industry or making a living as artist)
Sinix Design (has some tips on drawing people)
Winged canvas (art school for free on a verity of mediums)
Bob Ross (just a good time, learn how to paint, as well as how too relax when doing art. "there are no mistakes only happy accidents", this channel also provides tips from another artist)
Scott Christian Sava (Inspiration and provides tips and advice)
Pikat (art advice and critiques)
Drawbox (a suggested cheap online art school, made of a community of artist)
Skillshare (A cheap learning site that has art classes ranging from traditional to digital. As well as Animation and tutorials on art programs. All under one price, in the USA it's around $34 a month)
Human anatomy for artist (not a video or teacher but the site is full of awesome refs to practice and get better at anatomy)
Second part BOOKS, I have collected some books that have helped me and might help others.
📚Here is my list:
The "how to draw manga" series produced by Graphic-sha. These are for manga artist but they give great advice and information.
"Creating characters with personality" by Tom Bancroft. A great book that can help not just people who draw cartoons but also realistic ones. As it helps you with facial ques and how to make a character interesting.
"Albinus on anatomy" by Robert Beverly Hale and Terence Coyle. Great book to help someone learn basic anatomy.
"Artistic Anatomy" by Dr. Paul Richer and Robert Beverly Hale. A good book if you want to go further in-depth with anatomy.
"Directing the story" by Francis Glebas. A good book if you want to Story board or make comics.
"Animal Anatomy for Artists" by Eliot Goldfinger. A good book for if you want to draw animals or creatures.
"Constructive Anatomy: with almost 500 illustrations" by George B. Bridgman. A great book to help you block out shadows in your figures and see them in a more 3 diamantine way.
"Dynamic Anatomy: Revised and expand" by Burne Hogarth. A book that shows how to block out shapes and easily understand what you are looking out. When it comes to human subjects.
"An Atlas of animal anatomy for artist" by W. Ellenberger and H. Dittrich and H. Baum. This is another good one for people who want to draw animals or creatures.
Etherington Brothers, they make books and have a free blog with art tips.
📝As for Supplies, I recommend starting out cheap, buying Pencils and art paper at dollar tree or 5 below. If you want to go fancy Michaels is always a good place for traditional supplies. They also get in some good sales and discounts. For digital art, I recommend not starting with a screen art drawing tablet as they are usually more expensive.
For the Best art Tablet I recommend either Xp-pen, Bamboo or Huion. Some can range from about 40$ to the thousands.
💻As for art programs here is a list of Free to pay.
Clip Studio paint ( you can choose to pay once or sub and get updates. Galaxy, Windows, macOS, iPad, iPhone, Android, or Chromebook device. )
Procreate ( pay once for $9.99 usd, IPAD & IPHONE ONLY)
Blender (for 3D modules/sculpting, animation and more. Free)
PaintTool SAI (pay but has a 31 day free trail)
Krita (Free)
mypaint (free)
FireAlpaca (free)
Aseprite ($19.99 usd but has a free trail, for pixel art Windows & macOS)
Drawpile (free and for if you want to draw with others)
IbisPaint (free, phone app ONLY)
Medibang (free, IPAD, Android and PC)
NOTE: Some of these can work on almost any computer like Clip and Sai but others will require a bit stronger computer like Blender. Please check their sites for if your computer is compatible.
So do with this information as you will but as you can tell there are ways to learn how to become an artist, without breaking the bank. The only thing that might be stopping YOU from using any of these things, is YOU.
I have made time to learn to draw and many artist have too. Either in-between working two jobs or taking care of your family and a job or regular school and chores. YOU just have to take the time or use some time management, it really doesn't take long to practice for like an hour or less. YOU also don't have to do it every day, just once or three times a week is fine.
Hope this was helpful and have a great day.
"also apologies for any spelling or grammar errors, I have Dyslexia and it makes my brain go XP when it comes to speech or writing"
An artist : Aw man! I saw my arts were reposted on Instagram. I’ve asked them to take my arts down but they ignored me.
Me : Say no more! Click this link, then click ‘fill out this form’. Fill the form and wait for about 1-2 days, the staffs will remove the image you were reporting from the reposter’s account :^)
Ways to get to know your characters:
These are just some ways I do t, feel free to add your own tips!
Google sheets. Just google sheets. Make a sheet for your story and create categories to fill on your character's traits. Very simple example:

2. Making Pinterest boards. Listen maybe I'm biased because I'm on Pinterest more than I'm on Tumblr and it gives me the most intense nostalgia of any website/app ever, but it may be my most helpful tactic. This works in plenty of ways. Making a board for one story's character designs and making individual categories for each character in that board. Making individual board for each character's design, aesthetic, personality, whatever. No example but I think you get it.
3. I might sound like you lame ass ELA teacher from 9th grade or whatever when I say this, but plot mountains are really helpful. Now I don't mean the plot plot for all you, "I just start writing and am as surprised as my characters when everything goes to shit." writers like me, I'm talking about an internal plot. To explain, there is an external plot (exposition, rising action, climax, etc.) and internal plot (character development,) making external plot mountains isn't helpful for me because I want freedom in my writing. I know where it starts and sometimes where it stops and that's good enough, but writing the development of a character is good to outline just for the foreshadowing and because CHARACTER FLAWS ARE FUCKING IMPORTANT. (Cue the one post about eating mayo packets)
4. Mark their birthdays in your calendar. Like google calendar or whatever the fuck you use. Anyway, dedicate their birthday to just getting to know them. Make a wish list of presents they'd like, or a slideshow about the party activities they'd like, or a pinterest board about what their party theme would be. It's fun, I swear.
5. Make lists of a bunch of stuff. Their flaws, their strengths, their favourite thing, their pet peeves, their favourite people, their pets, their little quirks they have, etc.
6. Physical objects. Make them, buy them, or just stuff you already have. Make a little box of things they'd like or have. Treat them like a friend. A real person. It'll inspire you to write or draw more and you can come up with little backstories on the items.
7. Give them a catchphrase. Even if they never say it, it's cute. I like them. Most people do, I think.
Can't afford art school?
After seeing post like this 👇
And this gem 👇
As well as countless of others from the AI generator community. Just talking about how "inaccessible art" is, I decided why not show how wrong these guys are while also helping anyone who actually wants to learn.
Here is the first one ART TEACHERS! There are plenty online and in places like youtube.
📺Here is my list:
Proko (Free, mostly teaches anatomy and how to draw people. But does have art talks and teaches the basics.)
Marc Brunet (Free but he does have other classes for a cheap price. Use to work for Blizzard and teaches you everything)
Aaron Rutten (free, tips about art, talks about art programs and the best products for digital art)
BoroCG (free, teaches a verity of art mediums from 3D modeling to digital painting. As well as some tips that can be used across styles)
Jesse J. Jones (free, talks about animating)
Jesus Conde (free, teaches digital painting and has classes in Spanish)
Mohammed Agbadi (free, he gives some advice in some videos and talks about art)
Ross Draws (free, he does have other classes for a good price. Mostly teaching character designs and simple backgrounds.)
SamDoesArts (free, gives good advice and critiques)
Drawfee Show (free, they do give some good advice and great inspiration)
The Art of Aaron Blaise ( useful tips for digital art and animation. Was an animator for Disney. Mostly nature art)
Bobby Chiu ( useful tips and interviews with artist who are in the industry or making a living as artist)
Sinix Design (has some tips on drawing people)
Winged canvas (art school for free on a verity of mediums)
Bob Ross (just a good time, learn how to paint, as well as how too relax when doing art. "there are no mistakes only happy accidents", this channel also provides tips from another artist)
Scott Christian Sava (Inspiration and provides tips and advice)
Pikat (art advice and critiques)
Drawbox (a suggested cheap online art school, made of a community of artist)
Skillshare (A cheap learning site that has art classes ranging from traditional to digital. As well as Animation and tutorials on art programs. All under one price, in the USA it's around $34 a month)
Human anatomy for artist (not a video or teacher but the site is full of awesome refs to practice and get better at anatomy)
Second part BOOKS, I have collected some books that have helped me and might help others.
📚Here is my list:
The "how to draw manga" series produced by Graphic-sha. These are for manga artist but they give great advice and information.
"Creating characters with personality" by Tom Bancroft. A great book that can help not just people who draw cartoons but also realistic ones. As it helps you with facial ques and how to make a character interesting.
"Albinus on anatomy" by Robert Beverly Hale and Terence Coyle. Great book to help someone learn basic anatomy.
"Artistic Anatomy" by Dr. Paul Richer and Robert Beverly Hale. A good book if you want to go further in-depth with anatomy.
"Directing the story" by Francis Glebas. A good book if you want to Story board or make comics.
"Animal Anatomy for Artists" by Eliot Goldfinger. A good book for if you want to draw animals or creatures.
"Constructive Anatomy: with almost 500 illustrations" by George B. Bridgman. A great book to help you block out shadows in your figures and see them in a more 3 diamantine way.
"Dynamic Anatomy: Revised and expand" by Burne Hogarth. A book that shows how to block out shapes and easily understand what you are looking out. When it comes to human subjects.
"An Atlas of animal anatomy for artist" by W. Ellenberger and H. Dittrich and H. Baum. This is another good one for people who want to draw animals or creatures.
Etherington Brothers, they make books and have a free blog with art tips.
📝As for Supplies, I recommend starting out cheap, buying Pencils and art paper at dollar tree or 5 below. If you want to go fancy Michaels is always a good place for traditional supplies. They also get in some good sales and discounts. For digital art, I recommend not starting with a screen art drawing tablet as they are usually more expensive.
For the Best art Tablet I recommend either Xp-pen, Bamboo or Huion. Some can range from about 40$ to the thousands.
💻As for art programs here is a list of Free to pay.
Clip Studio paint ( you can choose to pay once or sub and get updates. Galaxy, Windows, macOS, iPad, iPhone, Android, or Chromebook device. )
Procreate ( pay once for $9.99 usd, IPAD & IPHONE ONLY)
Blender (for 3D modules/sculpting, animation and more. Free)
PaintTool SAI (pay but has a 31 day free trail)
Krita (Free)
mypaint (free)
FireAlpaca (free)
Aseprite ($19.99 usd but has a free trail, for pixel art Windows & macOS)
Drawpile (free and for if you want to draw with others)
IbisPaint (free, phone app ONLY)
Medibang (free, IPAD, Android and PC)
NOTE: Some of these can work on almost any computer like Clip and Sai but others will require a bit stronger computer like Blender. Please check their sites for if your computer is compatible.
So do with this information as you will but as you can tell there are ways to learn how to become an artist, without breaking the bank. The only thing that might be stopping YOU from using any of these things, is YOU.
I have made time to learn to draw and many artist have too. Either in-between working two jobs or taking care of your family and a job or regular school and chores. YOU just have to take the time or use some time management, it really doesn't take long to practice for like an hour or less. YOU also don't have to do it every day, just once or three times a week is fine.
Hope this was helpful and have a great day.
"also apologies for any spelling or grammar errors, I have Dyslexia and it makes my brain go XP when it comes to speech or writing"
You can say that again Buddy! Humans are so crazy unique that it's not even funny!
I want to tell a story to the artists and would-be artists out there.
When I was 19, I made a large oil painting of the nerd I would eventually marry. I poured all my attention and care into this painting. It's the only art I have from back then that still holds up as a work I'm proud of today.
I entered it into a judged show at the local art center. It got an honorable mention. I went to see the show with my beloved model. One of the judges came up to talk to me, and highlighted that all the judges really liked the painting. It would have placed, except, you see, the feet were incorrect. They were too wide and short, and if I just studied a bit more anatomy-
I called over my future wife, and asked her to take off her shoe. Being already very used to humoring me, she did. The judge looked at her very short, very wide little foot. Exactly as I'd lovingly rendered it. I would never edit her appearance in any way.
The judge looked me in the eye, and to his credit, he really looked like he meant it when he said "Oh I'm so sorry."
Anyways the moral of the story is that all of those anatomy books that teach you proportions are either showing you averages, or a very specific idea of an idealized body. Actual bodies are much more varied than that.
So don't forget to draw from observation, and remember that humans aren't mass produced mannequins. Delight in our variation. Because it's supposed to be there.