Egyptian Gods
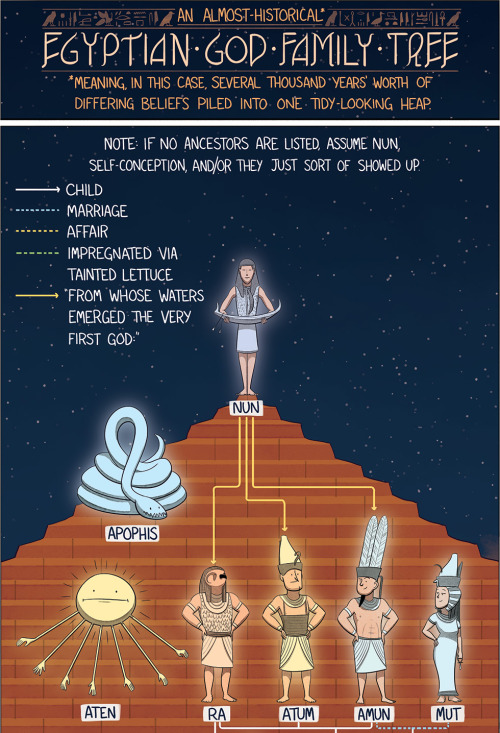
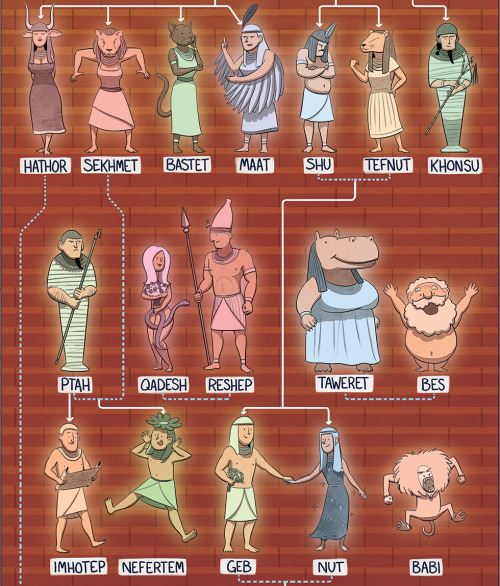
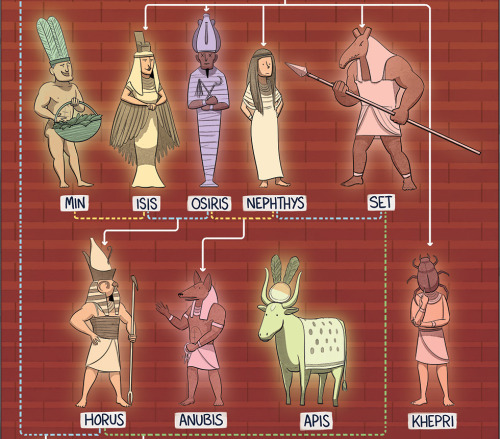
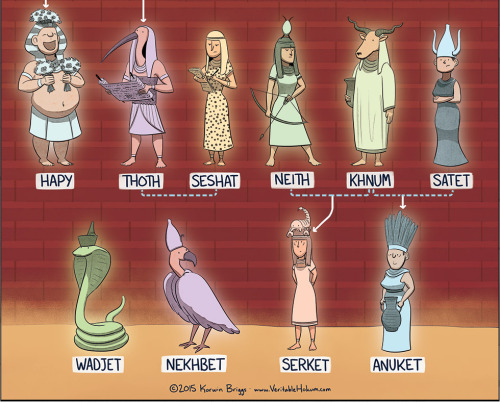
Egyptian Gods
More Posts from Zelo-ref and Others

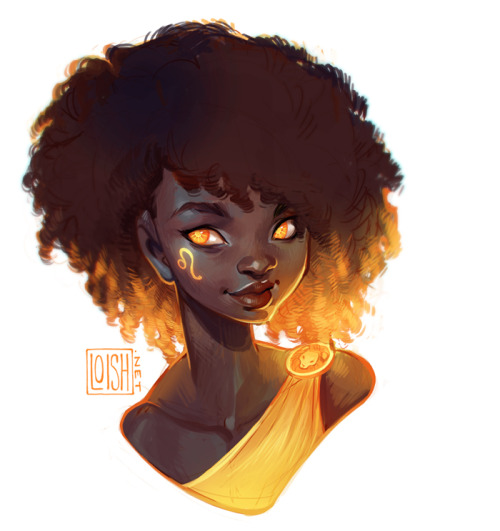
another commission drawn for one of the backers of my (now closed) artbook kickstarter campaign! this one’s for Talia, who wanted a character with lots of references to the leo zodiac sign.


Audrey Fry - https://www.facebook.com/fryillustration - https://www.etsy.com/shop/fryillustration - http://audreyfry.blogspot.com.es
8 Wedding Veil Styles
1. Angle
The Angle is a type of wedding veil that can be worn to the side of the head giving you a slight angle to the front (or to the back of the crown). This particular example features soft illusion netting and is finished with bobby pin loops for easy addition to a fascinator (fascinator example shown in photo below, right).

2. Bavolet
A Bavolet veil has a blusher veil on the front with a back snood style (snood refers to a type of garment worn at the back of a woman’s head). These two types of veils – the blusher and the snood – are sewn together to create one veil. In this particular example, the front veil can be flipped for the reception to provide another look.

3. Blusher
A blusher veil is very versatile and can be worn on the side of the head, back of the head, or flipped for a snooded look at the reception.

4. Elbow Length
This next style offers a dramatic look with fullness. An elbow length veil traditionally hits at your elbow and this particular example measures 32″ in length; it also features a corded edge. Elbow length wedding veils can be one-tiered (as shown) or two-tiered for additional fullness.

5. Fingertip Length
The fingertip length veil is a traditional choice and, as shown below, can be made in a two-tiered style for added volume. The second tier can be used as a blusher when you walk down the aisle, which can be then worn back during the reception. As the name suggests, this veil measures approximately to the length of your fingertips.

6. Cap
The cap refers to the portion of the veil that sits atop the head and frames the face. This particular example, for instance, uses ribbon to create a capped look that is simply timeless.

7. Mantilla
A mantilla veil is one that is lined with a wide edging of lace. This example below uses Alencon lace to frame your face beautifully.

8. Cathedral
The Cathedral veil makes a statement with its floor-length elegance. This veil can measure between lengths of 6 feet, 7 feet, 8 feet, or even 9 feet.

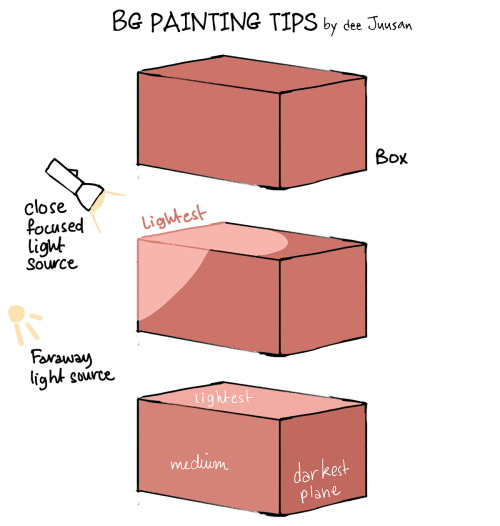
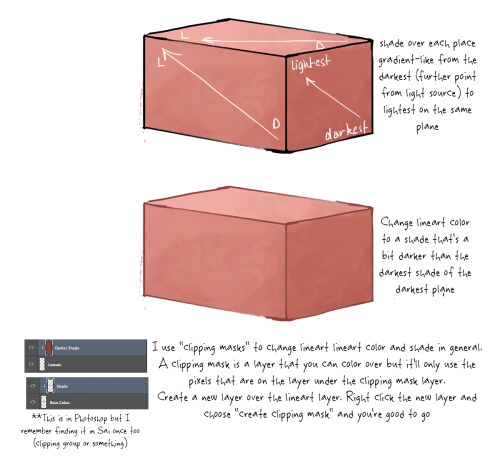
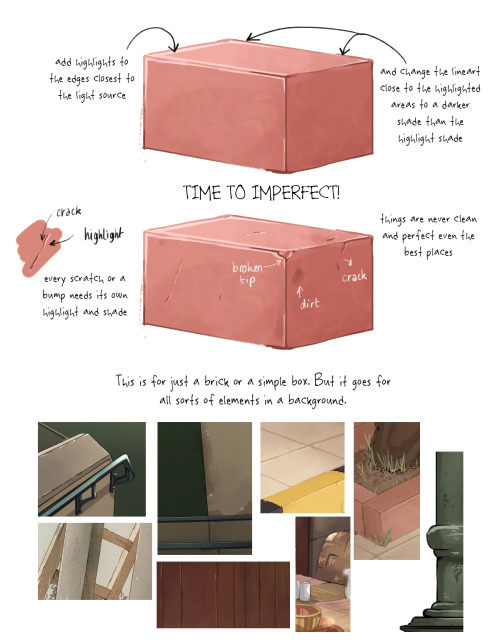
A quick tutorial on how I paint (mostly angular) shaped objects in a BG.

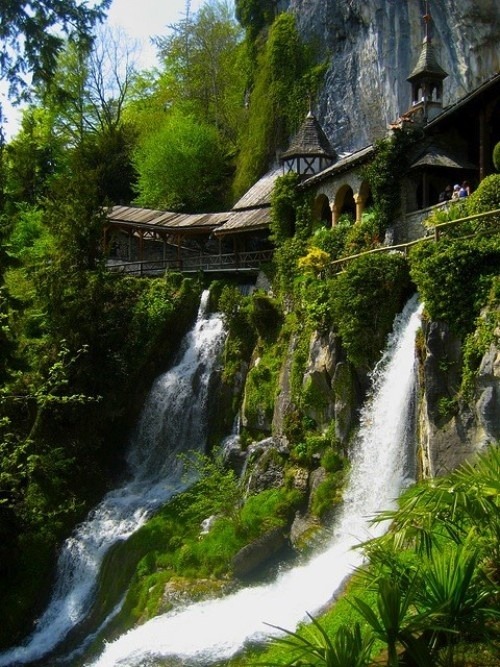
These are waterfall castles located in Poland. (Source)


Cat Language 11" x 17" Print cat pictures art


People will stare. Make it worth their while → Julien Macdonald prêt-à-porter | S/S ‘13
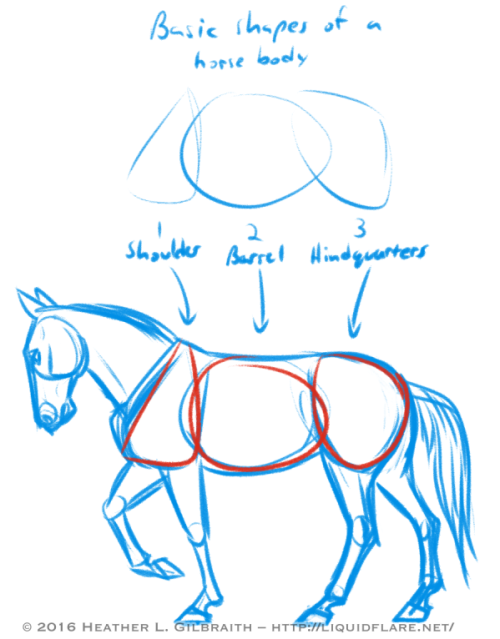

– Horse Drawing Tips –
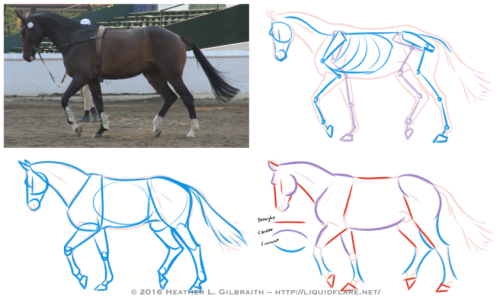
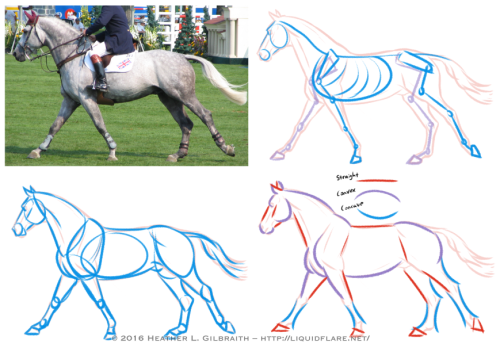
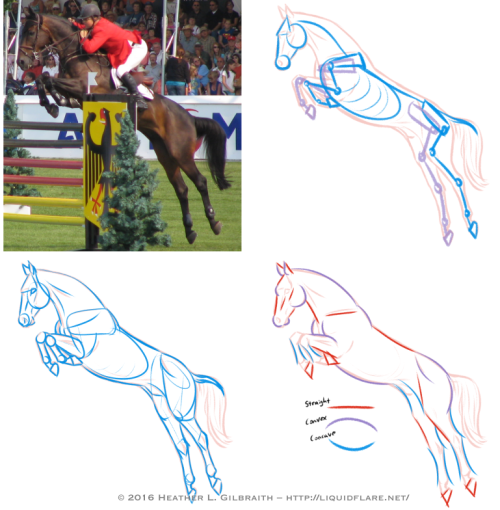
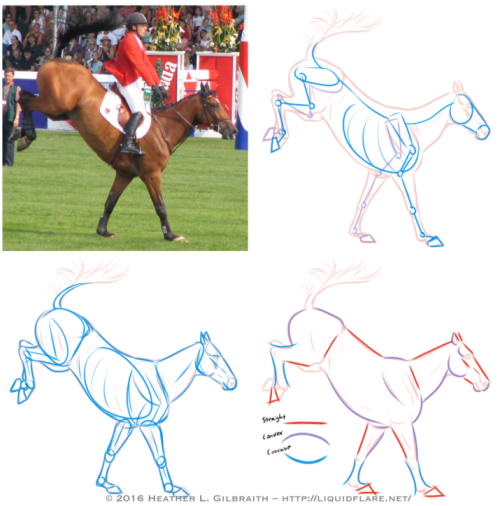
Hello, all! I thought I’d put this together to try and give people a place to start when trying to learn about and understand horse anatomy. Drawing horses, like anything else, definitely requires some work and observation to be able to draw confidently, but some of the these ideas/tips can help you find ways of analyzing references and simplifying forms to make the journey easier. Drawing horses doesn’t have to be scary! Read on for some notes on the drawings above…
Basic Shapes of a horse body:
Use these shapes to help you block in the body forms of your horse and to help you simplify the anatomy of the horses you draw. When you study photos of horses, try to see how these shapes move/stretch in relation to the horse’s pose/action.
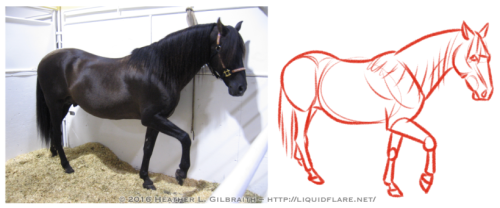
Horse Anatomy Studies:
1) Standing/Walking:
a. Reference photo – Start with a photograph that you’d like to study. Try to choose a clear one with visible anatomy (obscured as little as possible) and interesting shapes.
b. Outline – The outline gives me a point to start from to analyze the anatomy of the horse from the photograph. I use it as a guide for the next few steps.
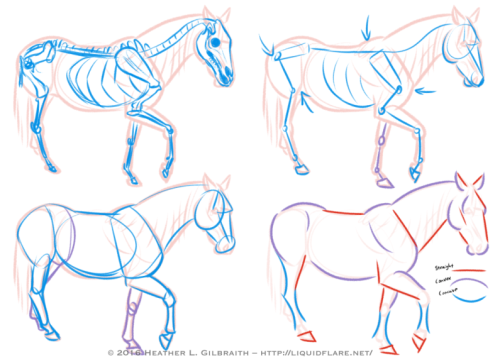
c. Skeleton – The skeleton usually takes too much time to do with every photograph, but it’s very helpful to be aware of the bones of a horse, so you know what you’re working with. Do a few of these with a drawing/photograph of a horse skeleton for reference and familiarize yourself!
d. Simplified Skeleton – Then draft out a quick, “simplified” skeleton. Try to block out the important angles, joints, and important anatomy reference points, such as the shoulder/elbow bones and the hip/knee bones. These angles will go a long way to helping you get the proper feel for a horse and the way its body naturally moves.
e. Simple Block Shapes – From there, block out the forms of the horse. Keep the skeleton in mind, but be aware of the masses of muscle and fat that moves with and covers the bones. Find ways to simplify the shapes that work for you, and try using these shapes in the future when blocking in a drawing of a horse.
f. Curves vs. Straights – Juxtaposing curved (both concave and convex) and straight lines helps to emphasize the anatomy, and add a pleasing sense of rhythm to your drawing. Experiment with emphasizing convex curves vs. concave curves, or straights against curves, etc., to get a look that is pleasing to you and also compliments the horse’s anatomy.
2) The Trot: The trot is a horse’s natural “jogging” gait, the next gait up from a walk. When trotting, the horse almost always has at least one, usually two, hooves on the ground at any moment. Remember that in most cases, horses walk/trot/canter/etc. with opposite legs moving together or in sequence; for example, right front leg raised, and left back leg raised, while the other two legs (left front leg and right front leg) are bearing the weight. Remember this when sketching your horse’s pose! (The exceptions to this are pacers and Icelandic horses doing the “tolt”, feel free to look them up!) When drawing this gait, it is sometimes helpful to emphasize the two opposing legs that mirror each other; with two legs straight/weight-bearing, and too legs extended/bent/moving. Keep the opposing legs in tandem with one another and you’ll have this gait down!
3) The Canter/gallop: Cantering is a horse’s natural running gait. In this gait it’s possible for all of a horse’s hooves to leave the ground for a moment with each stride. If a canter is a horse’s equivalent a human’s run, then a gallop is a sprint; in a gallop a horse reaches its maximum stride length and speed, though they don’t have the endurance to keep a full-on gallop up for long. When drawing the canter, watch out for which legs are bearing the weight and use that the guide you. (In my photo example, the right back leg and the left front leg are currently bearing the weight, with the right front leg about to take the weight to allow the left front leg to raise. Ugh, complicated…!)
4) The Jump: It’s when jumping that a horse reaches its maximum “stretch”! Keep in mind that a horse’s back is not very flexible (which is what makes them great to ride!), so try to keep that spine straighter/stiffer than you would for a dog or a cat. Bending the horse’s spine too much will start to make it look broken, or at the very least, very old and decrepit, as horse’s spine starts to bend/sag with age.
5) The Landing: To emphasize the weight of a horse coming down on its front hooves, be sure to bend it’s “toe joint”, or pastern, so that its fetlock or knuckle joint is nearly touching the ground. Let that joint bend to absorb the shock of the landing!

Try to avoid these common anatomy mistakes when drawing horses. Study photos and the horse’s skeleton/anatomy to avoid these! (And seriously, please forgive how horrible these drawings are! I literally whipped them up in only a few minutes, haha…)
Afficher davantage
-
 kechara-moon reblogged this · 1 month ago
 -
 crystalstargirlz liked this · 6 months ago
 -
 keibach73 reblogged this · 8 months ago
 -
 thebookthiefsblog liked this · 1 year ago
 -
thebookthiefsblog reblogged this · 1 year ago
-
 frutify reblogged this · 1 year ago
 -
frutify liked this · 1 year ago
-
 mohamed-577-kamar liked this · 1 year ago
 -
 thisisgettingdifficult reblogged this · 1 year ago
 -
 lacivettamascherata liked this · 1 year ago
 -
 somepoetryshit liked this · 1 year ago
 -
 mochigoogies reblogged this · 1 year ago
 -
 kristytinna liked this · 1 year ago
 -
 smilercats2 reblogged this · 1 year ago
 -
smilercats2 liked this · 1 year ago
-
 amzaki13-blog liked this · 1 year ago
 -
 frightninbolt liked this · 1 year ago
 -
 primordialgod liked this · 1 year ago
 -
 yxeoubi liked this · 1 year ago
 -
 jovae-eagle liked this · 2 years ago
 -
 meninjablue liked this · 2 years ago
 -
 achitachi reblogged this · 2 years ago
 -
 themadmayhem liked this · 2 years ago
 -
 mannofmisstery liked this · 2 years ago
 -
 keorahuntress716 liked this · 2 years ago
 -
 panicatthesocialmedia reblogged this · 2 years ago
 -
 mindless-mars reblogged this · 2 years ago
 -
 ilovewhodunit reblogged this · 2 years ago
 -
ilovewhodunit liked this · 2 years ago
-
 redmoonfaerie reblogged this · 2 years ago
 -
 rinsachi reblogged this · 3 years ago
 -
 izzysblg liked this · 3 years ago
 -
achitachi reblogged this · 3 years ago
-
 subtleyvivacious reblogged this · 3 years ago
 -
 eastik reblogged this · 3 years ago
 -
eastik liked this · 3 years ago
-
 psionicillusionist reblogged this · 3 years ago
 -
psionicillusionist liked this · 3 years ago
-
 henrythecapybara liked this · 3 years ago
 -
kristinesoklife liked this · 3 years ago
-
 loopyprosciutto reblogged this · 3 years ago
 -
 rosefairyirl liked this · 3 years ago
 -
 fantasytwin liked this · 3 years ago
 -
 experimental-heresy liked this · 3 years ago
 -
 mikeellee reblogged this · 3 years ago
 -
 baby-come-bach reblogged this · 3 years ago